Because life’s celebrations shouldn’t cost the Earth

Showing posts with label Badge machine. Show all posts

Thursday, 8 June 2017

Zipper Pouch Tutorial

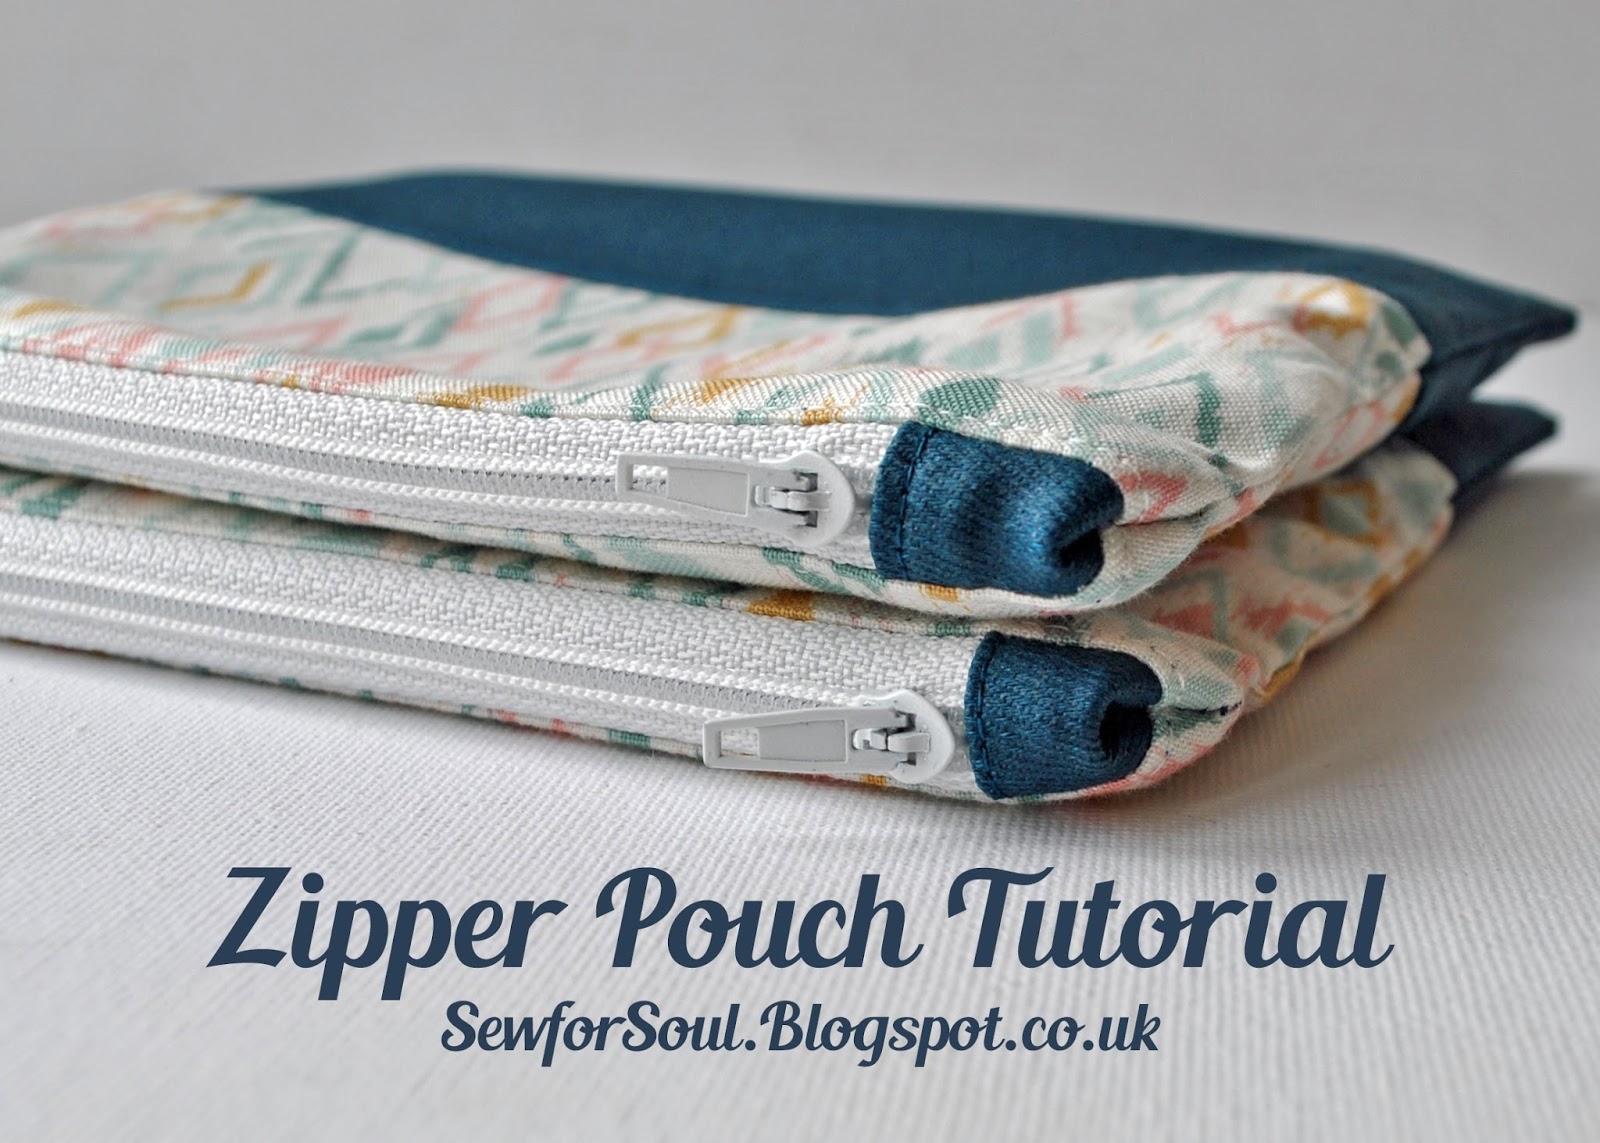
Lined Zipper Pouch with Matching Tabs & Contrast Panel 


Zipper pouches are my 'go to' project when stitching gifts.  They're so versatile and the recipient can always find a use for them: pencil case, make-up purse, travel bag, gadget case, clutch bag...etc....etc., the list is endless!

I stitched up this particular pouch for my husband's goddaughter.  The matching travel mirror, personalised with her initial, was made with my trusty badge machine one of my favourite playthings!


The dark green bottom panel is a 'waxy' type cotton which almost looks like leather.  It came from a pair of jeans that cost just 20p from a local car boot sale as I knew the fabric would be perfect for little sewing projects!  The eye-catching zigzag fabrics are from the 'Sophia' range by Makower and I originally used them to make these sprocket cushions, published in Sewing World Magazine.


Zipper pouches are the perfect sewing project for beginners as they (generally) only use straight lines.  They also introduce the slightly more challenging skill of inserting zips but their dinky size means should the worst comes to the worst not too much fabric is wasted!

On that note, it's important to remember that sewing does take practice and we all make many, many mistakes when learning.....and continue to do so!  My sewing has improved greatly over time simply because I've become more adventurous and now just get stuck in!  The main step in this direction was the growing prevalence of 'car boot sales' where I can buy old clothing, sheets, curtains, duvet covers...etc...etc., for next to nothing!  Previously purchasing supplies was an expensive business and as such I was extremely reticent to pick up my scissors and hack into fabric unless I was sure of the outcome. This obviously lead to a vicious circle whereby I didn't have many sewing skills but was too nervous to expand my stitching repertoire!

So grab some fabric, whether new or upcycled, and create your own gorgeous zipper pouch    

Zipper Pouch Tutorial  


Use a 1 cm seam allowance throughout.

The first step is to create the pouch exterior.  Cut two 21 x 11 cm rectangles from your chosen patterned fabric for the pouch top and two 21 x 7 cm rectangles from a contrast fabric for the lower section.  If the fabrics are a pale colour or light weight consider applying a fusible interfacing to the wrong side of your rectangles.

Sew together in pairs and then press seams towards the darker fabric.  Top stitch lower contrast panel for a lovely professional touch.  


Next cut two 21 x 16 cm rectangles from your lining fabric.  I chose a darker colour as this makes for a much more forgiving and practical choice, disguising make-up smudges or marks from leaky pens!

Now stitch the zipper tabs using your contrast fabric and this tutorial from one of my previous posts. If you want to miss this step out just make sure that your zipper is at least the width of your prepared pouch pieces!


The next step is to create your zipper sandwich.  To do this simply place your lining piece down with right side up and centre your zip on top of it right side up, there will be some overhang but this is trimmed off later along with the seam allowances.  Then put one of your lining pieces on top, wrong side up. Pin or tack the zip sandwich securely and then sew in place using a zipper foot. Repeat for the second side.


Open out the pouch and press neatly.  Then top stitch through all layers of fabric on either side of the zip, using your zipper foot or an edge stitch foot.  As with the stitching on the lower panel, it gives a professional finish and also prevents the lining from getting caught in the zip when in use.


Match up the outer fabrics right sides together and the lining fabrics, again right sides together. Ensure that the zip is at least half way open so that you can turn the pouch right side out after stitching!

Pin the sides together pushing the zip tab bulk towards the lining.  Then sew all the way around the outside, leaving an opening in the lining for a turning gap.


Trim seam allowances to reduce bulk.  Turn the pouch through to the right side and gently push out rounded corners using a large wooden knitting needle or other blunt point.

Lightly press and then using a small ladder or slip stitch hand sew the opening closed.


You've now stitched a fabulous zipper pouch!


Wednesday, 24 June 2015

Time flies......

Confirmation Gifts

Last week saw thirty youngsters from our parish receiving the sacrament of Confirmation.  As we attend Mass on a weekly basis the children have known each other from birth - They've also all been in the Catholic school system since the age of five, so they really have grown up together.  Whilst I support my husband and children in their faith by attending church with them, I'm not actually religious myself, so I took a back seat in the whole process but my husband was a sponsor for one of the girls, Anna and her father did the same for George.  To mark the occasion, I stitched Anna up a little 'Dumpling Pouch' along with a matching appliquéd mirror. 


It can be easy as a parent to get caught up in the daily rush of life and I know I don't always take the time to sit back and  reflect upon my children's positive points. Instead I always seem to be constantly nagging about music practice, homework, revision...etc....etc.  However, they are actually really rather lovely and despite our dodgy parenting skills are even growing into decent human beings!  

One of the benefits of having an active faith is becoming part of an amazing extended 'family' and the support that this provides.  For us this also translates into weekends away where, as a group, we rent a holiday property in various stunning locations and thirty to forty of us just kick back and enjoy each other's company (along with lots of good food and alcohol!). We have been doing this for well over a decade and the picture below was taken on last year's jaunt to Robin Hood's Bay.  George is sitting at the front and just behind him is Anna.  At the back is Rebecca who is taking her GCSEs this year and is my daughter's 'God-sister' due to her mum being Alice's Godmother.  Sitting in front of her is Sita who is as beautiful on the inside as she is on the outside.
       

Anna's dad took these pictures and looking at them reminds me of what a wonderful time we always have and this autumn's trip has already been booked!


Girls, unlike boys, are quite easy to buy or make gifts for, but Anna and her family came up trumps and gave George with a lovely print of the Magna Carta which we will now get framed.


The dumpling pouches are quick to stitch up and can be embellished in loads of different ways.  I used this tutorial from Keyka Lou Patterns which I think is the best one out there.  She offers a choice of two sizes and I stitched up the smaller one because it's so cute!


Tuesday, 15 July 2014

Teacher Appreciation

End of Term Treats


As this academic year draws to a close, it's time to get stitching and crafting to remember all those hardworking individuals who make such a difference to the world of our children.  

Alice requested a little handbag mirror, made using my trusty badge machine for her teacher.  I based the cute applique on the 'Apple Thanks' digital stamp which available exclusively at Handmade Harbour. 


It's such a versatile design and looks equally gorgeous when used in paper crafting, as this fabulous card expertly demonstrates.  It was made by the very talented Teresa over at The Fat Cactus, a beautiful blog well worth visiting.


George wanted a string of bunting for his French teacher who has had the pleasure(?) of teaching him for the last two years.  He reports that she always goes the extra mile for her pupils, and has even been known to bring in enough home-made crepes for the entire class!

We found some lovely fabric which was absolutely perfect for what we wanted, as it features various French patisserie recipes, including pancakes and crepes.  Another plus point was the black background, which will complement any colour scheme, and also shouldn't need washing too often when hung in a busy classroom or steamy kitchen!


In order to use the fabric as economically as possible some flags are actually upside down but they still look pretty cute and really rather shabby chic.   Bunting always makes a perfect gift and I posted a nice and simple tutorial here should you fancy whipping up some up for yourself. 


George then designed and printed an elegant bag topper to use as packaging, which I inked and glittered.


Thank you to all the wonderful teachers who have touched the life of my children!

Sunday, 2 March 2014

Appliqued Make-Up Bag

Embroidered VW Beetle 'Bug' Car


This week is 'World Book Day' and most primary schools in the UK encourage their pupils to attend school dressed as a character from their favourite book.  My daughter loves the 'Heroes of Olympus' series of books by Rick Riordan and wants to go as 'Piper'.  I am somewhat short of inspiration and so was pleased to have another project to work on whilst I waited for my costume making ideas to start flowing!

Here's what I busied myself with instead;


An applique of a classic Volkswagen Beetle.  I based the design on a digital stamp from Handmade Harbour and I think it captures the cuteness of this iconic car perfectly.  

The applique formed the front of a little zipper pouch which is an ideal size for a pencil case or cosmetics purse.


In the background you can see a matching personalised compact mirror.  The lovely 'dotty' fabric is from a pair of upcycled nursery curtains.  They are a heavy weight cotton canvas so make for a pretty but durable pouch.  


Whilst I was sewing my companion took it easy lying in the full sun of the bay window, still this is preferable to her usual position on top of my sewing machine where she insists on chasing my fingers and the spool of thread!


I first tried the bug with little antique mother of pearl headlights but then decided that the yellow worked better with the background fabric.  The buttons will have to be saved for another project, I love using them as they came from my Great Grandmother's button box so must be at least seventy or eighty years old!


Now back to World Book Day!

Thursday, 14 February 2013

Appliqued Mirror

Free Motion Embroidered Pocket Mirror


Now Mr. Larkin and I are not aficionados of the grand romantic gesture, so Valentine's Day often passes us by.  Although last year I did sew him a personalised tissue holder, surely something every man secretly desires? Actually this expression of my love did not have him in raptures of pleasure, so this year it will just be a bottle of lager, if he's lucky! 

I've still been sewing though, and have 'borrowed' an American idea of using Valentine's as an opportunity to show appreciation to teachers!  Now I might be slightly biased, but surely this is one group of professionals which really does deserve the undying gratitude of society?

My daughter does love her teacher and so we made her a little mirror for her bag....


It is only a small gift, but hopefully one which will express our thanks for the hours of work and love she puts into the education of all the students in her care.

The colours have come out a little muted in the picture, but it is a pink and white polka dot heart appliqued onto a linen background.  I also stitched a pure wool presentation pouch to pop it into.

Happy Valentine's Day!


Sunday, 10 February 2013

Embroidered Beer Bottle Opener

As you may have seen in my post yesterday, I made a tea cosy for a much loved friend.  Well today, I made a 'beverage accessory' of a slightly different kind;

A Bottle Opener!


The children's very most favourite-ist Uncle (& his wife) have come to visit for the weekend and they wanted to give him a present, so out came the badge-making machine.  I whipped up a gift that I thought he might actually have a use for!  

I'm not sure what he really made of it, but he and Mr. Larkin are humouring me and drinking more beer than they actually want to, whilst watching the rugby, 'just to try it out'.  My sister and I are quite overcome at their generosity of spirit...........

Here is a little picture of the opener in its packaging, but please excuse the fluff which must have been on the camera lens.

Did you spot the shadow of a hair across the bottom of the label? 

Wednesday, 16 January 2013

Mirror, mirror on the wall...

Who's the fairest of them all?

Having done some research on the web, it turns out that my Badge Machine was manufactured by the 'London Emblem Badge Company' and they sell a number of different components, which means that the machine is capable of producing more than just simple pin badges.  I relayed this exciting development to my Mum and look what has arrived in the post;


Lots and lots of yummy components, thanks so much Mum for such a thoughtful combined Christmas and Birthday present!

Having ripped open the boxes, I decided to have a go at making a couple of mirrors and bottle openers.  I was pretty pleased with the opener, but you'll have to wait before I post a picture of it as it's for a present and I don't want to spoil the surprise for a certain favourite uncle..... 

Next I had a go at a compact mirror for one of my Mum's friends.  I also made a matching a make-up purse with a waterproof lining to go along with it.  I didn't have any suitable waterproof material in the house, but then remembered my daughter had just grown out of a little red raincoat and as it was fairly well used I didn't feel too bad about cutting it up;

   
and this is the result;


I also made my daughter a 'Dumpling Purse' using this fantastic tutorial;


I popped in a mirror which I whipped up on the badge machine. Adorning it is a picture of Granny when she was about the same age as my daughter is now!


Tuesday, 15 January 2013

My new toy!

A badge machine


For Christmas the gorgeous Mr. Larkin gave me a shiny new badge machine. Well actually it was very much second-hand, but hey it only cost £105 including shipping instead of £475  new.  It might not be shiny and it is pretty bashed up, but it works beautifully!

Here it is;

I used it to make a couple of small presents before Christmas, mainly embroidered badges for the children's teachers.  I have since been being having a go at making personalised mirrors with it.  I'll share some pictures of those once they're finished.


***********

I walked my youngest to school this morning as usual and then popped to the shops where I treated myself to a magazine using the voucher my sister kindly gave me for my birthday.  I chose 'Style at Home' which was a very reasonable £1.99!  I never normally purchase magazines, so was quite excited to flick though it, and as I did I found an article on 'blogging', something dear Mr. Larkin has been suggesting to me for rather a while.  Just as I was doing this the snow started to come down.

So..... I spent the afternoon  learning how to blog!  The idea was to then spend some time in the evening sewing.  However, this blogging stuff is proving fun but time-consuming, so it has spilled into the time set aside for stitching!  Hopefully I'll sew again tomorrow......

Christmas badges

The rest of the crafting world has probably already posted all of their Christmas creations and moved onto Valentines, Easter and other spring themed wonders, I'll do that next week I promise(hmm, unlikely!).  However, having only discovered blogging this afternoon I'm a little behind.  Never mind as here are the little gifts I made with my 'new' badge machine.  These are personalised badges which I free-motion embroidered on my regular sewing machine.


The sewing machine I use and love is a Bernina Aurora 440 QE.  Once again this was a second-hand purchase and I have had it for two years and use it most days.  I would hate it to fail on me as I would now struggle to live without it!