Because life’s celebrations shouldn’t cost the Earth

Tuesday 9 April 2013

Felt Cupcake Toppers

Little Felt Ornaments


Alice has lost her Japanese Kokeshi Doll hair slide.  I originally made a set of three of these as Mr. Larkin's beautiful god-children are Japanese on their mother's side and celebrate Hinamatsuri, 'Doll's Festival' or 'Girl's Day', on 3 March each year.  We have searched and searched and Alice's has still not turned up, so I guess I will have to make a replacement.  In one last ditch hope, before I get started, I pulled out our box of felt cake toppers in case it had been inadvertently been tidied away there.  Alas, no luck, but as they were out I thought I would take a few photos of some of them to share with you.

The shapes were either cut by hand or with my Sizzix machine and then hand stitched and embellished. I wanted to have a 'staged' photo shoot with real cupcakes but they would never last long enough in this household!  So instead I used some vintage wooden cotton reels, they are definitely much nicer than the modern ones.


I cut the little birdies using a Quickutz die, but if you don't have a die-cutting machine simply cut a basic bird shape by hand.  The eyes are french knots, the wings are stab stitched and the edges have been blanket stitched.  I glued a little bead under each topper for a touch of bling, they really catch the light.  We use them at Easter, but they would also be super for a baby shower. 


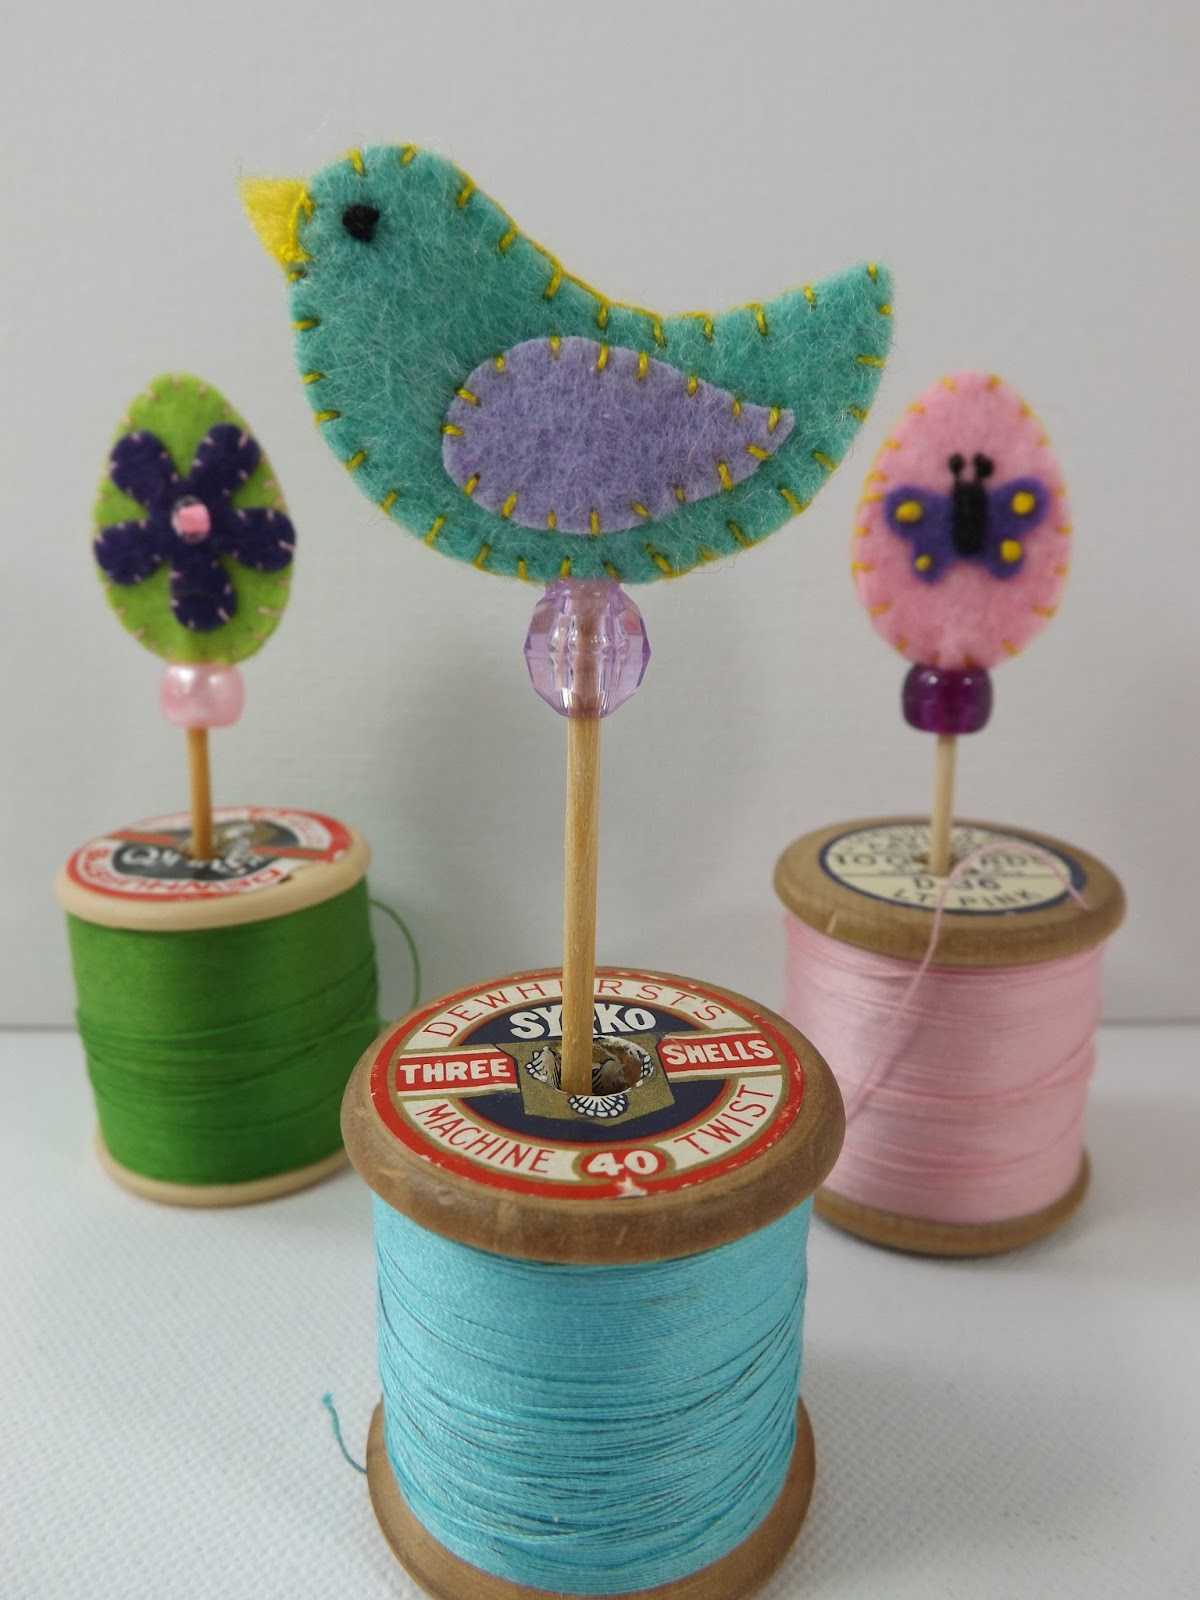
The mini Easter egg ones are pretty cute too and with a pin on the back would be perfect as a little brooch or hair clip.


Everyone loves cup-cakes and this yummy example was also cut using a Sizzix die.  The sprinkles are tiny glass beads.


I made loads of these owls for a Halloween party, but this lonely lad is the only one left!


This bird is a little big to be a cake topper and would probably have suited being a brooch or hair barrette better!


Russian 'Matryoshka' Dolls


Felt is a great material to use as it is widely obtainable and is easy to sew as it doesn't fray.  I also like having a hand sewing project on the go as it means I can take it anywhere rather than being 'tied' to the sewing machine.  Now I better get started on Alice's Kokeshi Doll.  Watch out for the new post as soon as it's finished xx

Saturday 6 April 2013

A Quilted Cover for My Shopping Trolley!

Wheeled Shopping Trolley Tutorial


My much loved shopping trolley finally gave up its last hold on life this week.  I have sewn up the seams so many times and now even I had to admit defeat and consign it to the bin.  However, I could not bring myself to spend money on a new one when the frame was basically sound, so there was a last minute reprieve when I decided to make my own replacement cover.  

Here it is before the makeover


Not a pretty sight!


Look at it now!


Much better!

Here's how I did it...

Shopping Cart Tutorial

Supplies

I recycled as much as I could from the old trolley, salvaging the velcro and top drawstring.  The additional items I used were spray glue, waterproof lining, bias-binding, main fabric and lining fabric.

The industrial waterproof layer was actually given to me on a roll from my mother, who in turn got it from her uncle, an undertaker.  He was a true gentleman of the old school and was born in 1916, a generation who did not approve of waste.  I think he would be delighted to know we are still finding uses for his gifts! 

I then pulled the old cover apart

In theory I should have unpicked the seams carefully as I needed the pieces as a pattern for the new cover.  In reality I just cut it open - The old cover had been mended and machine darned so many times this was the only way!

Next I cut and made my new pieces

In the photo above I have already made a 'quilt sandwich' with the main fabric, waterproof liner and lining fabric.

The lining fabric was an old patchwork quilt so had wadding (batting) ready attached.  This should mean it keeps my frozen shopping cold.  You can also see from the photo that I bound the raw edge of the top flap with a jaunty yellow bias binding.

I didn't bother with a pocket in the back, as I can just chuck everything into the trolley itself.  The original pocket was on the flap which held the cover to the frame itself.  Here is the new piece sewn onto the back, I slipped it on to check the fit before sewing the whole thing together.


It fitted!  So I zoomed up and down the seams on my machine a couple of times. It was an easy project as there was very little shaping needed.  The top closure is just a drawstring which I took from the old cover.  There is also a little strap on the back, this fits over the bar on the handle and is then held to the rear panel with velcro. It prevents the whole thing from slipping down the frame. 

Check out the Granny-chic patchwork lining!


Wednesday 3 April 2013

Quilted Easter Cones

Free Motion Embroidery & Raw Edge Applique


It's almost time to pack away the Easter things, so I thought I would share one more Spring post with you all before I turn my thoughts to creating Summer items.  A couple of years ago I made 25 of these cones, with 15 different designs.  Only George and Alice's remain, as all the rest were given away as presents.  However, my brother has taken some wonderful photos of the two I made for his children.  I also had a couple of photos from this year of the new cones I stitched for our god-children.


I free-motion quilted the fabric in a pattern which I think is officially  know as 'stipple or stippling'.  Surely just a posh term for random squiggles?

The designs have been applied using raw-edge applique and more free motion embroidery around the edges. 


The standard of the next three photos is not really of a very high quality, but the setting sun does at least obscure the damage caused by a certain family member who I can only presume was jealous at not receiving a cone of her own....


...bad jealous kitty!


Tuesday 2 April 2013

Chocolate Crown of Thorns Tutorial

Easter Cake Decoration


Granny made us a yummy cheese cake for Good Friday and Alice and I were given the task of decorating it.  This is what we came up with;


Granny was really pleased with it, so she decided to make another two for the lunch on Easter Sunday.  It was such an easy cake topper to make, so I thought I would post a quick tutorial to share with you all.  However, we were a little short of time because everything (including the food shopping) had to be done on Easter Saturday, as on the Sunday both of our children were reading the bidding prayers.  Alice is still only at junior school and I'm not sure I would have wanted to read in a Mass with 200-300 present at such a young age.

Anyway, the point I am trying to make is that I didn't have time to take many photos.  Fortunately, it is such an easy decoration to make that it doesn't require lots of in-depth pictures!

How to make a chocolate Crown of Thorns


Gather up what you need.  For this simple decoration, it's just three items; Greaseproof paper (parchment), chocolate sticks and chocolate glue!

We used our local supermarket's own brand of chocolate sticks, but they are basically that old throwback from the eighties 'Matchmakers'.  I know some people suggest using pretzels or bread-sticks, but these would take a lot of chocolate to cover them and involve much more mess and time.  

The first step is to draw a circle on your parchment paper, just a little smaller than the cake you wish to decorate.


You now need to melt some chocolate and using dabs of this as your 'glue' simply build up your 'sticks' into a  crown shape.  Here is our first layer;


Now continue in the same vein, breaking the odd stick into smaller pieces and placing at 'thorn-like' angles until you have something which looks like this;


Leave until set and then peel off the paper - I was surprised how 'solid' it felt.

Now place on cake;


The whole thing took less than twenty minutes, in fact producing and printing Jesus' 'Notice of Accusation' took longer.

A less religious variation would be a smaller ring with chocolate eggs in the middle as a cute Easter nest!