Because life’s celebrations shouldn’t cost the Earth

Showing posts with label Upcycling. Show all posts

Tuesday, 28 May 2019

Upcycled Vintage Linen Bunting Tutorial

Repurposed Embroidery ~ Tablecloth Garland DIY!


It's been a year since my last post, but I have been kept busy!  I  gave up teaching in 2016, when I was manoeuvred into being a carer for my husband's parents, and it turns out looking after the elderly takes as much time and emotional energy as full-time teaching, marking and preparation!  

I can now only muster the time to sew 'special projects' and this is one of those.  Last month a very lovely friend gifted me the most amazing stash of material and vintage linens.  His father has recently died and so David and his sister have been house clearing - The females of the family were extremely talented needlewomen and I have been honoured to receive work created by his mother, aunt and grandmother.           


Look at the tablecloth above - It is absolutely beautiful!  It can seem strange to cut up such gorgeous pieces of work, but as so few of us now use tablelinens, these family heirlooms risk being tucked away in a drawer never seeing the light of day!  By repurposing them into new items they can once again be enjoyed on a daily basis.  

Bunting garlands are very easy to create, if you can sew in a straight line you can make one.  Even if your seams aren't quite straight....then simply embrace your very own shabby chic boho vibe!

Tutorial

The first step is to choose the shape of your bunting flags, this will depend on personal choice and the design and size of the embroidery on your vintage linens.  Just to get you started, here's some ideas;


I wanted to stitch up two strings of bunting, so that David and his sister could each have a set.  The two tablecloths I picked out to use suited quite different flag shapes and sizes, but the same method was used to create both. 


Once you've decided on your flag shape, the next step is to make a template.  Now maths and geometry are not my thing so there's no chance of me using a set square and protractor or even a ruler ~ instead I just created my templates in Word.  Simply open a new blank document, click on insert shapes, pick the one you want and then flip and drag it your heart's content!


Now trace your flag template onto a piece of clear acetate, you can either do this straight from your computer screen or print a paper copy first.  

Tip: I keep the clear windows from cardboard packaging (giftsets, toiletries etc) for just this purpose, it saves me money and acetate needs separating from cardboard before it goes into the recycling bin anyway!

Next, gently press your antique linens and if they've become thin from countless years of love and use, stabilise by applying iron-on interfacing. Mark out your first bunting flag using the clear acetate template to select your favourite areas of embroidery (fussy cutting) and then cut out. Repeat for the desired number of flags.


Using the template and lining fabric, cut out flags for the reverse of the bunting. Place right sides together with linen front pieces and then machine stitch around three sides, leaving the tops open.


Trim seam allowances, clipping across the bottom point, to reduce bulk


Turn the flags right sides out and gently push out the point using a chop-stick or other blunt instrument. Trim off the little ‘ears’ at the top to create a straight edge, then press.


Unfold a length of co-ordinating bias-binding and place the flags (approximately 1cm apart) inside it. Remember to allow some spare tape at either end of the bunting garland so that it can be tied or hung in its finished position. Machine stitch into place using the fold line as your guide.


 Now fold the bias binding over to the back of the garland and hand or machine sew into place (Alternatively, for a quicker, easier and cheaper finish, simply fold and press a length of ribbon or plain tape in half and then machine stitch flags into place). 


And that's it, a beautiful bunting garland, full of love and memories!


Perfect for an Easter Party or Spring Wedding!


Baby blue lace bias binding perfectly accentuates the delicate Forget-Me-Nots 


All done, ready to be gifted back to the original seamstress's grandchildren!


It was such a pleasure to be able to bring a family item back to life, all too often these amazing linens end up being thrown away or sold in charity shops and car boot sales for mere pennies.  They also make stunning zipper pouches, quilts and bag, I shall be keeping my eye out during the summer car boot season ready to rescue even more! 


Tuesday, 15 May 2018

DIY Applique Bunting Tutorial

Meet 'Refuse' Chester Le Street! 


Due to the increasing health needs of my elderly parents-in-law, I now have precious little time to blog or sew but I've been working late into the night this week to welcome a wonderful new venture to Durham!


The REfUSE Cafe is a not-for-profit social enterprise which collects food that would otherwise go in the bin to make delicious Pay-As-You-Feel (PAYF) meals.  Its founders are Nikki Dravers and Mim Skinner who met as students at Durham University.  After graduation Nikki worked at the Durham Marriott Hotel where, at end of every breakfast shift, she was told to throw away huge amounts of mushrooms, sausages, bacon, bread and freshly squeezed juice. In the afternoons she was volunteering for the Salvation Army in Durham where she witnessed real food poverty, this injustice led Nikki to The Real Junk Food Project which in turn inspired her to set up REfUSE and, after a couple of years operating as a 'pop-up', they now have a permanent location in Chester-le-Street.

All the food in the cafe is provided by local shops, supermarkets and businesses having been deemed to be either 'surplus' or past its 'best before' date. The menu is ever changing, as it is obviously dependant on what has been donated on the day, but expect lots of delicious soup and curries, gorgeous quiches, filling sandwiches and simply scrumptious cakes - all lovingly hand baked on the premises!  Customers are then provided with an envelope so that they can pay what they feel is an appropriate amount for their feast.

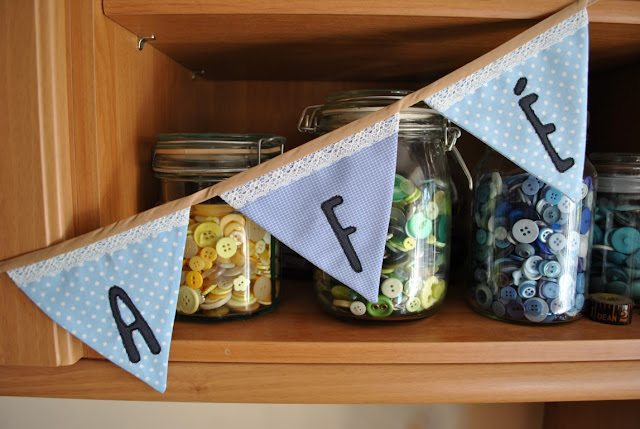
To celebrate this amazing venture I've stitched Mim and Nikki a string of personalised bunting, fashioned from some of Mr Larkin's worn out work shirts!          


Upcycled Shirt Bunting Tutorial


The first step is to make a template for your fabric letters and bunting flags. Simply use Microsoft Publisher/Word, or similar software, to create a 14 cm equilateral triangle and then resize your chosen font (I used 'Moonflower' to match the cafe's logo) until the letters fit nicely in the middle of the triangle.  Print onto thin card and cut out. 


Now take your card letters and turn them over before tracing around them onto the smooth side of a sheet of Bondaweb.  Iron onto the wrong side of  your dark fabric and cut out.....They will now be facing the right way round!  Cut the required number of pennant flags from (upcycled) fabrics, not forgetting to cut out the same number of linings. 


I then introduced some lace to the design as I thought a touch of 'shabby chic' would work well in the cafe.  


If you also fancy this look simply stitch a strip of lace to the top of each of your fabric triangles 


Now take your Bondaweb letters and remove the backing paper before placing them centrally onto the flag fronts and, once you're happy with the positioning, fix into place with a hot iron.


Next, using black thread and an open-toe machine foot, sew around each of the letters at least twice to create a 'sketchy' feel.  Don't worry if you have a couple of wobbles as this all adds to the appeal of raw edge appliqué!

Place each appliquéd flag onto a triangle cut from your lining fabric, right sides together, and stitch the side seams leaving the top open (it looks like I've stitched the top seam, but that's just where the lace was sewn onto the triangles!).  Trim seam allowances and clip the bottom point to reduce bulk. Turn the flags right side out and use a chopstick or blunt stick to carefully push out the points, then gently press with a warm iron.


Finally, unfold a length bias binding tape and place flags inside at approximately 2 cms intervals, lining up top edges.  Make sure you leave at least 15 cms of tape at both ends of the garland for hanging purposes, then machine stitch.  If you don’t have any bias-binding simply use some pretty ribbon or tape folded in half.


You've now created a beautiful upcycled fabric bunting garland! 


Perfect for summer vibes!


REfUSE Waste....


Recycle Food and Fabric!


Should you ever find yourself in the stunning North East of England pop into the REfUSE Cafe for a delicious, and ethical, handcooked lunch!


Wednesday, 11 October 2017

Napkin Decoupage Tutorial

DIY Stamping Technique


 'How far that little candle throws his beams'


It has been ages since I've been able to craft, but this week I managed to squeeze in the time to make some little upcycled tea light holders.  They were inspired by a damaged 1940s copy of 'The Complete Works of Shakespeare' which I bought from an Oxfam charity stall at the Festival of Thrift.  I actually hate the idea of destroying books but this one was in such battered condition, both inside and out, that I was instead providing it with a new lease of life.....


I therefore hoped William wouldn't mind too much my tearing up his (damaged) plays to paste onto a candle holder but, just in case, I only used images that paid due homage to his literary legacy!

I clearly took some liberties with historical accuracy though, as he obviously wouldn't have used a dip pen and ink.  However, given I also included typewriter images, it soon became a bit of an anachronistic free for all!


I employed the same gorgeous book page decoupage technique for the background as these upcycled Easter eggs.


Now whilst I absolutely love pasting images cut from napkins onto random objects there are some major disadvantages to using purchased paper serviettes, namely their price and being restricted to a limited choice of designs.

I obviously wanted Shakespeare themed napkins for this project but a quick internet search only threw up these and at £35 a pack they were waaay out of my price bracket!

Luckily there's some absolutely brilliant Shakespeare rubber stamps out there, including this wonderful 'Writers' set by Cherry Pie Art Stamps


Tutorial 
Supplies

Plain White Paper Napkins
Stazon Permanent Ink
Stamps
Scissors
'Book Page' Tea Light Holder (or any other random object)

Method


Firstly completely cover your chosen item with strips of paper torn from damaged texts or old newspapers.  You could use modge podge decoupage medium for this but I thin down PVA glue (USA - Elmers) with 50% water and it works just as well but only costs pennies!  Use the full step by step book page tutorial I posted here.


Once the book page background is completely dry, you're ready to add some DIY stamped napkin images.  It really is as ridiculously easy as stamping your chosen design onto a plain paper serviette! 


Simply separate your napkin, so that you're left with a single ply.  Then, using a permanent ink such as Stazon, stamp your images straight onto it.  Note because you're going to be stamping onto a thin single ply there's a definite chance of marking the work surface underneath, don't ask how I know that!  (I recommend protecting your desk with a sheet of scrap paper 😀)

Trim your images as closely as possible to the stamped outline.  As William was a little too tall for my tea light holders I also chopped off his legs!

You've just created your own unique set of napkin images all ready to be decoupaged.  I guarantee you'll now be looking at your stash of stamps in a whole new light, liberating yourself from the stilted choice of purchased napkins!


"How far that little candle throws its beams! So shines a good deed in a naughty world"
William Shakespeare, The Merchant of Venice 


To see Shakespeare with his legs intact, check out my altered tin cans!


Finally, an outtake......


Thursday, 13 July 2017

Upcycled Vintage Map Bunting

DIY Map Garland


As UK schools inch towards their six week summer holiday, teachers seem to become more creative with their homework tasks and the academic pressure eases off a little.  My daughter's geography class were put into small groups this week and told to create a recycled product for a 'Dragon's Den' style lesson!

She and her friends created this gorgeous upcycled garland using old maps, vintage lace and felt manufactured from 100% post-consumer plastic bottles.

It was an easy make and they only needed the smallest amount of help from me, so I thought we would share the process in this quick tutorial. 


Supplies

Old Maps
Cream Lace
Bias Binding Tape
Eco-felt
Pinking Shears

Step One

Cut a triangle template from thin cardboard (use a protractor and pencil or favourite computer programme!) and then round lower corner.

Lightly mark out map triangles, using your template and faint pencil. Roughly cut out each map triangle leaving at least an inch margin on sides.

Step Two

Layer map triangles onto backing felt and then machine stitch directly on top of your pencil lines.   Remove from sewing machine and trim just outside stitched line.  We used pinking shears but it would work equally well with regular scissors!  


Step Three

Unfold bias binding tape and place map flags and lace inside, with the triangles at approximately 2 cms intervals, lining up top edges.  Make sure you leave at least 15 cms of tape at both ends of the garland for hanging purposes, then machine stitch.  If you don’t have any bias-binding simply use some pretty ribbon or tape folded in half.


Step Four

Turn bias-binding tape to back of garland flags and hand sew into place using matching thread and a small slip or ladder stitch....and that's it!


See, it was easy!


The felt backing not only adds beauty to the finished garland, it also protects the paper maps from tearing.  I just love the addition of the cream lace too, so shabby chic!


Quick to stitch bunting makes a perfect present, and a garland using maps that hold special memories for the recipients would make it even more precious, especially for a wedding or housewarming gift!


The geography teachers obviously liked the project and voted it as their winning idea - My daughter's group graciously allowed them to keep the finished garland, hopefully not as a bribe to win! 


Happy Stitching!