Because life’s celebrations shouldn’t cost the Earth

Showing posts with label Decoupage. Show all posts

Wednesday, 11 October 2017

Napkin Decoupage Tutorial

DIY Stamping Technique


 'How far that little candle throws his beams'


It has been ages since I've been able to craft, but this week I managed to squeeze in the time to make some little upcycled tea light holders.  They were inspired by a damaged 1940s copy of 'The Complete Works of Shakespeare' which I bought from an Oxfam charity stall at the Festival of Thrift.  I actually hate the idea of destroying books but this one was in such battered condition, both inside and out, that I was instead providing it with a new lease of life.....


I therefore hoped William wouldn't mind too much my tearing up his (damaged) plays to paste onto a candle holder but, just in case, I only used images that paid due homage to his literary legacy!

I clearly took some liberties with historical accuracy though, as he obviously wouldn't have used a dip pen and ink.  However, given I also included typewriter images, it soon became a bit of an anachronistic free for all!


I employed the same gorgeous book page decoupage technique for the background as these upcycled Easter eggs.


Now whilst I absolutely love pasting images cut from napkins onto random objects there are some major disadvantages to using purchased paper serviettes, namely their price and being restricted to a limited choice of designs.

I obviously wanted Shakespeare themed napkins for this project but a quick internet search only threw up these and at £35 a pack they were waaay out of my price bracket!

Luckily there's some absolutely brilliant Shakespeare rubber stamps out there, including this wonderful 'Writers' set by Cherry Pie Art Stamps


Tutorial 
Supplies

Plain White Paper Napkins
Stazon Permanent Ink
Stamps
Scissors
'Book Page' Tea Light Holder (or any other random object)

Method


Firstly completely cover your chosen item with strips of paper torn from damaged texts or old newspapers.  You could use modge podge decoupage medium for this but I thin down PVA glue (USA - Elmers) with 50% water and it works just as well but only costs pennies!  Use the full step by step book page tutorial I posted here.


Once the book page background is completely dry, you're ready to add some DIY stamped napkin images.  It really is as ridiculously easy as stamping your chosen design onto a plain paper serviette! 


Simply separate your napkin, so that you're left with a single ply.  Then, using a permanent ink such as Stazon, stamp your images straight onto it.  Note because you're going to be stamping onto a thin single ply there's a definite chance of marking the work surface underneath, don't ask how I know that!  (I recommend protecting your desk with a sheet of scrap paper 😀)

Trim your images as closely as possible to the stamped outline.  As William was a little too tall for my tea light holders I also chopped off his legs!

You've just created your own unique set of napkin images all ready to be decoupaged.  I guarantee you'll now be looking at your stash of stamps in a whole new light, liberating yourself from the stilted choice of purchased napkins!


"How far that little candle throws its beams! So shines a good deed in a naughty world"
William Shakespeare, The Merchant of Venice 


To see Shakespeare with his legs intact, check out my altered tin cans!


Finally, an outtake......


Thursday, 19 May 2016

Upcycled Shabby Chic Tin Cans

Vintage Book Page Pen Pots


I took a little break from sewing this week and instead indulged myself with lots of lovely cutting and sticking, making these vintage style pen pots from old tin cans.  I used the same basic technique as my decoupage book page eggs, which remains one of my most popular posts of all time.


Would you believe they started out as cheap and tacky plastic eggs?!  


As the tin cans are intended to be used as desk tidies for stationery supplies, I decided to theme them around novelists and works of literature.  Not surprisingly I was unable to source any suitable printed paper napkins, so instead I stamped plain white serviettes using the stamp sets below;


I used an old book of quotations, which had seen far better days, for the script background and then gave the cans a quick colour wash of watered down brown paint to enhance their 'foxed' antique finish. After this I carefully trimmed the stamped tissue images before sticking them to the cans with thinned white PVA glue (USA - Elmers).  This is sooo much cheaper than Modge Podge, just add water until the glue is the consistency of thin single cream.  The final step was to give each can a couple of coats of polyurethane varnish.


Unique upcycled craft storage tin cans!


Thursday, 30 April 2015

Reloved Magazine ~ SewforSoul Feature April 2015

Decoupage Napkin Eggs 


Easter seems ages ago but officially the season lasts fifty days until Pentecost, which this year is 24 May ~ I therefore don't feel too bad about this post appearing 'late'!


My decoupage eggs were featured in April's edition of Reloved Magazine.  Whilst they can be used as Easter decorations, I keep mine out all year around.  They've also proved to be pretty popular over on Pinterest having been repinned over 10,000 times and counting!


Reloved also gave me a lovely little write-up in their 'Blogs We Love' feature which was totally unexpected but very flattering!


Wednesday, 28 January 2015

Valentine's Jewellery Box

DIY Decoupage Decals


The Design Team theme over at Cuddly Buddly this month is Valentine's and I whipped up this little box for our darling goddaughter.  I used the same tissue paper and inkjet printer method as for these Halloween candles;


This technique allows you to take any picture and turn it into an image thin enough to decoupage onto your chosen surface.   It also means that you can create personalised items.  As our goddaughter is Japanese, finding a shop bought jewellery box (American - jewelry) with the name 'Ayana' on it might have been a long-shot!

Before....

During....

After!

You can find the full tutorial on the Cuddly Buddly Blog and the William Morris inspired clip-art can be purchased here.

Happy Valentine's Day!


Tuesday, 30 September 2014

Halloween DIY Printed Candles

Steampunk Inspired Tutorial


As well as my usual stitching, I'm also busy preparing for George's Halloween birthday party.  I kept my eyes open throughout the Summer car boot sale season for anything fitting our Victorian Gothic / Steampunk theme and now have lots of lovely upcycling projects to share over the next few weeks!

Firstly we want the house to be candlelit for the dinner but I was taken aback by the price of pillar candles in the shops, so they were a definite on my 'booting hit-list', (provided they cost 20p or less!)  Luckily I found plenty but, having been purchased secondhand, they were all different sizes and varying shades of white and cream. Some of them were also warped, presumably having being displayed on sunny windowsills, and all were rather grubby.   They were therefore in desperate need of a revamp and here are the results;


Steampunk Inspired Candles

I had already designed the party invitations and the artwork I used was also perfect for this project.  Having the same strong images running throughout creates unity, and a gives far more stylish and glamorous feel than you would expect from a thrifted event!


Easy DIY Printed Candle Tutorial

The candles were super easy to produce and cost mere pennies using materials you probably already have;

Supplies
Candles
Inkjet printer or ink-pad and stamps 
Tissue paper
Printer paper
Glue stick
Hairdryer
Scissors

An uninspiring grubby start!

The first step is to transfer your chosen images to the tissue paper.  If you have suitable Halloween stamps simply use these, otherwise a quick search of the internet will throw up hundreds of possibilities!

I was using printed images, so cut down a sheet of tissue paper to the same size as a regular sheet of copier paper.  My tissue was upcycled from gift packaging so I also gave it a quick press with my iron before securing it to the copier paper with a tiny dab of glue in each corner.  Both sheets were then feed thorough the printer in the usual manner.


Here they come!

Now cut out the printed images, trimming closely to the outlines.  Depending on the sharpness of your scissors it might be easier to achieve this whilst the tissue is still backed with the thicker printer paper.


The final stage is to fix the trimmed images to the candle fronts using the heat from your hairdryer.  Another quick dab of glue stick prevents an image from fluttering off in the warm air before it's fully fused!


As the hairdryer heats up the candle, the edges of the tissue paper magically disappear, sinking gently into the molten wax. In the above photo you can just make out the tissue edge around the skeleton's right hand and leg but in another second or two they'll be gone!

All finished


Halloween Gothic Candles 


I've made over thirty of them but here are just two making their debut in this year's 'Glamorous Gothic' mantel display.  


Happy Halloween!

Friday, 13 June 2014

SewforSoul ~ Reloved Magazine Feature

Beano Comic Book Table 


Last year the children and I created a 'graphic novel' decoupage table that I blogged about here.  I included a tutorial, which proved to be quite popular, and so a couple of months ago I was asked if it could be used as a feature in 'Reloved Magazine'.  

Well, it's in the July edition and copies are on the shelves and available for purchase now;


Reloved Magazine July 2014


SewforSoul Decoupage Table

Those of you with keen eyesight might also have noticed another SewforSoul creation on the front cover of the magazine, I actually have two features published there this month!  It's all very exciting, although they did manage to get my name wrong in both articles, but at least the blog address is correct!


Check out pages 34 and 38!

Next week I'll share a couple of pics of the vintage bunting article, which was based on this post.  It looks lovely and is a gorgeous three page spread!  If you can't wait until then pop along to your local WHS and nab a copy for £4.99.

Monday, 3 February 2014

Oh, So Shabby French Chic - Decoupage Eggs!


 'Vintage' Papier Mache Book Page Eggs - Part Deux


Whilst up in the loft this weekend I discovered some more plastic Easter eggs so, once again, I got busy with the PVA glue and created these gorgeously shabby chic decoupage eggs!


I applied strips torn from an old book of quotations for the background layer and 'aged' the eggs with a quick wash of watered down poster paint before adding images cut from a pack of paper napkins.


If you feel inspired to create your own Easter objects d'art take a look at my Decoupage Egg Tutorial where you will find full step by step instructions and photos.


 The serviettes I used for this project were 'Butterfly Mail' by Paper-Design.


I purchased mine on eBay and was lucky enough to be the only bidder and paid just 99p for the pack of twenty.  I made fourteen eggs in total and only used three napkins as each one has four printed sides.   Quite a few shops on the internet have them in stock at the moment, including Cuddlybuddly.com and Amazon, or you might just pick up a bargain at eBay.  I also have some spares if you're desperate, just message me!


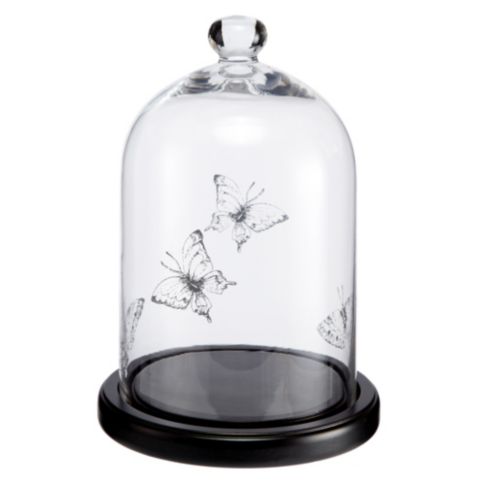
I then spotted these 'Butterfly Print Cloche and Bases' whilst I was shopping in Sainsburys and I'm hoping Mr Larkin and the children might treat me to one (or two) as a Mothering Sunday gift.  They would look perfect displaying my eggs on Easter Sunday either adorning the piano or dinner table.  


The description on the Sainsbury's site states 'The butterfly print cloche from our botanical range is a beautiful object in its own right, and a lovely way of displaying treasured possessions'. 

Hmm....do my eggs count as 'treasured possessions'?

Monday, 20 January 2014

Plastic Eggs ~ Napkin Decoupage Tutorial

Using PVA is much 'cheeper' than Mod Podge!


Last Friday I received an email from the rather marvellous 'Style at Home' magazine asking me about my plans for the Easter Bank Holiday.  'Blimey' I thought 'Christmas was only a fortnight ago!'.  Jen and her team have to work months ahead in order to meet the tight deadlines required to get the magazine onto the shelves for all us eager readers.  Still, that email gave me the little push I needed to start thinking about Spring and Easter projects.  I am planning to make 30 personalised and embroidered linen egg cosies as gifts for the guests at our annual party, which we hold after Mass on Easter Sunday.  I am still mulling over designs in my head (read procrastinating), so I grabbed my scissors and PVA glue and placed all thoughts of stitching aside.


Instead I decided to 'age' these unattractive plastic eggs.  We have bags of them left over from the egg hunts which the children used to enjoy when they were younger.  


 Most of the children in our social group are reaching the teenage years and an egg hunt is 'too young' for them.  So after lunch on Easter Sunday we either go for or a walk or have a retro sports day.  They're not too old for egg and spoon, sack and three-legged races!

The plastic eggs are now surplus to requirements so I got creative with an old book of quotations and some paper napkins and this is what I ended up with....


Antique Eggs!


 I wasn't sure how they would turn out, but I am really pleased with them.  They remind me of gorgeous Victorian botanical prints and book plates.  They were quite time consuming to produce, but the process was actually very easy and I am already dreaming about displaying batches of them under glass cloches and hurricane vases on the dinner table.

They cost next to nothing to produce and if you are a keen crafter you will probably already have all the supplies you need.  I used plastic eggs (obviously), book pages, watered down PVA glue, brown paint and some pretty paper dinner serviettes.

Tutorial 


I didn't prepare the eggs in any way at all, I didn't even bother gluing the two halves together and they worked perfectly, so grab your bits and pieces and jump straight in.

The first step was to stick on a layer of plain paper, I used some blank pages from the front of the book, onto to eggs using watered down PVA glue.  You don't need to worry about the exact ratio of glue to water, just aim for the consistency of very thin single cream.  I felt this first layer was necessary as the eggs were such lurid colours.  I guess you could just add more than one layer of printed book pages, but I didn't want too much print showing through.  Make sure you tear the paper rather than cutting it as this gives the pieces softer edges which blend into each other better when pasted down.


I worked in a little production line so that whilst one layer was drying I got started on the next egg.  I found that if I tried to stick too many paper strips onto an egg in one go I just ended up in a sticky mess!  I used an old, yellowed book of quotations, but if you don't have a suitable book to hand just use newspaper.


Once all the layers were completely dry, it was time to get creative with the paper napkins. I used botanical and butterfly themed versions.


Cut out your chosen image from the napkins, being sure to trim the design as closely as possible. Then separate the layers and, using the top ply only, smooth into place on your egg using more of the watered down PVA glue.  I used my finger for this part of the process as I found I had more control this way rather than using a paint brush.


 To complete the aging process I brushed some watered down brown poster paint over the eggs before quickly wiping off any excess.  A final coat of the PVA mixture will seal your finished final design and then you can simply sit back and admire your handiwork!