Friday, 28 February 2014

Appliqued Egg Cosies

Personalised Easter Gifts


It's another gorgeous sunny day in my part of the UK and it felt like the perfect time to get on with some Easter stitching.  I dragged some pretty pastel fabrics out of my stash and started stitching some cute linen egg cosies.

Mr Larkin and I host lunch after church on Easter Sunday each year for our friends.  Numbers depend on whether we have a finger buffet or sit down meal.  Last year we seated thirty-one, but if it's a buffet year there could be as many as forty to fifty guests. They are all very well trained though, I provide the main course and they each bring a contribution towards pudding!

The Easter Bunny makes an appearance and hands out presents from his basket.  Last year it was these little felt gift bags;


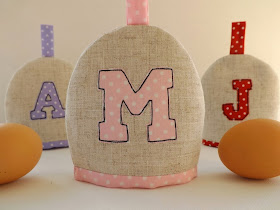
This year it's going to be egg cosies.  I have a short attention span, so I need to sew a few each week as I'll get bored if I have to stitch them all at once.  I'm also going to be sewing lots of different designs to keep my attention levels up and I'll share each new batch as I finish them.


This little bunny is so sweet, but very simple to sew.  I love this soft lilac colour but it would also be perfect in a more masculine navy.  The applique template was from 'Prima' magazine and you can get it here.

I traced the design onto fusible webbing (Bondaweb) and then free-motion embroidered in the black stitching details on my regular sewing machine.


I've also appliqued each guests' initial onto the back of the cosies, using a nice chunky font, for that personal touch.  I just love the jaunty dotty fabrics combined with the black stitching.


Happy Easter!


Wednesday, 19 February 2014

Appliqued Needle Book

Free Hand Machine Embroidered Needle Case


After a very wet week the rain finally stopped today and, as the sun came streaming in through my study windows, I was to be found happily stitching away creating this cute little needlecase.


As ever it's very much an upcycled project and regular readers will recognise the linen as being from a second hand pair of curtains which I have used for numerous previous projects.  The wonderfully kitsch floral print fabric was also sourced at a car boot sale and I just love its vintage vibe!

The adorable mother bird and babies work perfectly with the soft pastel colours and were based on a digital stamp designed by the very talented Wendy Massey over at 'Handmade Harbour'.  If you feel inspired to create your own applique or papercraft project with this cute stamp you can purchase it here.


The case has two large pockets on the front and back inside covers which are just the right size to hold a few essential sewing items such as embroidery scissors, unpicker or skeins of yarn.  I'm going to use it as a little travel sewing set and it will certainly be an improvement on the ripped plastic zipper bag I normally shove in my pocket!


I'm really pleased with how it turned out and the curved corners and top-stitching give the whole project a nice finished appearance. The word 'needles' was embroidered onto the front using my regular sewing machine and a technique known as free-hand or free-style machine embroidery.  This is basically a method of 'drawing' with your sewing machine by lowering the feed-dogs and then moving your fabric to create wording or designs.

Needle cases make great presents and my niece has just started sewing, having saved up her own money to buy her first sewing machine.  I'm sure she would be delighted to receive a case with her name embroidered on it xx

"Martha's new machine"


Friday, 14 February 2014

Mini Bunting Tutorial

Valentine's Day Fabric Garland


As Alice and I walked to school yesterday, she suddenly asked if I would make her some Valentine's Day bunting as presents for her friends.  "How many sets are we talking about?", I asked, "Nine" came the reply.

So I had a day to stitch seventy-two pennants and attach them to over ten metres of bias-binding.  "No Problem", I told her and quickly raced home to get started.

Now normally when I make bunting banners I like to take my time, in particular I hand-sew the bias-binding down so there is no visible stitching on the tape when viewed from the right side.  Today there was no chance! 

Instead, here's a cheat's guide to speedy bunting making.....


Your first step is to make a template for the flags.  My technical drawing skills aren't the best, so I opened a Publisher document and clicked on 'insert basic shape' choosing an equilateral triangle of 9cm.  Having all sides the same length saves confusion over which is the 'top'.  Once you have your template, trace around it onto your top fabric only.  I use a heat erasable pen sold under the name of Frixon (sic) or Fanthom (sic).  They are designed to be used, mainly by young students, on paper but are much cheaper than those sold specifically as dressmaking or quilting pens.


Put these triangles to one side and grab the fabric you intend using on their reverse. Do not cut individual triangles from this material, instead just cut or tear strips a little wider than the height of your template.  


Now simply lay your first flag down onto the strip, right sides together, and stitch.  Repeat with the next triangle and so on until you run out of fabric.  Then tear another strip and continue until all 72 have been attached!  

I was using recycled sheeting for most of this project.  The check fabric is the reverse side of the butterfly duvet set which I used for this journal cover.  I really recommend buying bedding at thrift shops and car boot sales as you can get metres of gorgeous fabric for mere pennies.


When all the flags have been sewn together, cut them out and snip the bottom of the triangle, as seen in the picture, to reduce bulk and create a neater final point.   Do not trim the top edge of the backing fabric.  Turn right sides out and press.


Now trim the excess backing fabric away, making both top edges equal, so that it looks like the middle flag above. 

I've not come across anyone else making their bunting in this way before, but trust me it saves sooo much time.  Other tutorials involve both front and back of each pennant being accurately traced and cut, which means they then have to be carefully pinned together so that they don't slip and move as you stitch them.  My cheat's method also means that you don't get those annoying little ears left at the top of each flag!

Once you have the required number of completed triangles stitch them to lengths of bias-binding to complete your garland.  If you're a bias-binding novice there are lots of great tutorials out there to help you, such as this one.  The method is a little different if you are going to hand stitch the binding down on the reverse side.  I just didn't have the time today to hand sew all nine sets!  However, I'm actually so used to the hand finishing method I inadvertently attached the binding the wrong way around on two of the sets.  It really doesn't make that much difference but if either of the recipients (or their Mums) notice, I apologise! 

I finished the project, including printing toppers for the packaging, with minutes to go.  I wasn't even late on the school run - Phew!


 Love Heart Sweets


Yummy Cakes


Postscript

You may have noticed a crafty thimble thief in this post....I might have been finished even quicker without the help of  a certain jealous kitty!


Happy Valentine's Day!

Sunday, 9 February 2014

Appliqued Home Bunting

Embroidered Cow Garland


Having spent the last week decoupaging eggs, I'm now ready to 'moo've' back into stitching again. I wanted a lovely spring project with bright fresh colours to lift me from the grey dark days of a UK winter.  The wind is blowing a gale outside and 'brrr, I'm Friesian'! 

You've got the hang of this post and yup I'm really 'milking' it here.  Any more puns would be 'udder' overkill!  So I'll stop and let you have a little look at this instead;


It's a present for a special friend who is really quite poorly at the moment.  I had been intending to make her some bunting for her classroom but that project has been put on hold as it might be some time before she is well enough to return to teaching.  Cows are her favourite animals so hopefully this cheery character will lift her spirits during a trying time.

I began by drawing a basic cow's face which would easily translate into an applique.  I then added a bit of colour so I could check that the design would work before I actually started cutting any fabric.


The photos don't reflect the colours particularly well, but I used brown for the facial markings and then some little scraps of polka dot fabric in shades of pink, white and green for the rest of the design.


The bias-binding is part of a batch which I made from an old pillow case.  It was perfect for this project as, by a stroke of luck, it contained all the right colours even down to the soft apple green of the lettering!


Get well soon Fiona!


Monday, 3 February 2014

Oh, So Shabby French Chic - Decoupage Eggs!


 'Vintage' Papier Mache Book Page Eggs - Part Deux


Whilst up in the loft this weekend I discovered some more plastic Easter eggs so, once again, I got busy with the PVA glue and created these gorgeously shabby chic decoupage eggs!


I applied strips torn from an old book of quotations for the background layer and 'aged' the eggs with a quick wash of watered down poster paint before adding images cut from a pack of paper napkins.


If you feel inspired to create your own Easter objects d'art take a look at my Decoupage Egg Tutorial where you will find full step by step instructions and photos.


 The serviettes I used for this project were 'Butterfly Mail' by Paper-Design.


I purchased mine on eBay and was lucky enough to be the only bidder and paid just 99p for the pack of twenty.  I made fourteen eggs in total and only used three napkins as each one has four printed sides.   Quite a few shops on the internet have them in stock at the moment, including Cuddlybuddly.com and Amazon, or you might just pick up a bargain at eBay.  I also have some spares if you're desperate, just message me!


I then spotted these 'Butterfly Print Cloche and Bases' whilst I was shopping in Sainsburys and I'm hoping Mr Larkin and the children might treat me to one (or two) as a Mothering Sunday gift.  They would look perfect displaying my eggs on Easter Sunday either adorning the piano or dinner table.  


The description on the Sainsbury's site states 'The butterfly print cloche from our botanical range is a beautiful object in its own right, and a lovely way of displaying treasured possessions'. 

Hmm....do my eggs count as 'treasured possessions'?

Saturday, 1 February 2014

Fabric Watch Strap Tutorial

Upcycled Watch Band


My watch strap broke this week and, as it was only an inexpensive watch in the first place, it didn't seem worth paying for a replacement but I didn't want to throw the whole thing away.  So I got rummaging in my stash of fabric scraps and stitched myself a new one. As broken straps are a common problem, and the replacement was extremely quick and easy to sew, I thought I would share a little tutorial.

How To Sew A Watch Strap


The catch refused to stay closed and it was only a matter of time before it fell off and got lost, so it had to go!  I carefully removed it using a pin and grabbed the rest of my supplies;

Fabric, rotary cutter or scissors, ruler and elastic


The elastic needs to be just a bit narrower than the strap it is replacing.  Wrap it around your wrist to determine how long it needs to be.  Remember it doesn't need to go around your entire wrist, it attaches to both sides of the watch face, a larger face therefore means you need less elastic.


My poor ruler looks like it has suffered an attack by the rotary cutter!

Cut a strip of fabric twice the finished width plus seam allowance.  My fabric was a slightly worn 'shabby chic' piece of durable cotton canvas.  I wanted the strap to be just under 2 cm when finished so I cut a strip 5cm wide (2cm + 2cm + 1cm seam allowance).  It needs to be long enough to slip over your wrist, the exact measurement depends on how gathered you want the finished strap to be, mine was 35cm which was perfect.

Now stitch along the long edge to form a thin tube.  Trim your seam allowance and turn through to the right side using a safety pin.  Press the seam open by slipping the tube over a thick knitting needle.  I find this trick means I can achieve a lovely neatly finished seam without squashing the whole tube.  In the photo it looks as though the sides have been pressed flat but it's just the camera angle, trust me the tube is still gorgeously round!


You now need to use your safety pin to thread the elastic into the tube.  Remember to pin the first end firmly into place so that it doesn't just pull straight through.


Push the elastic back into the tube so that ends of the fabric extend beyond the elastic by about 1cm.  Pin in place and then machine stitch securely, so that you just catch the ends of the elastic.  


Fold the raw edges over so that they are tucked inside the new strap and hand sew the gap closed using little slip stitches. 


Now turn the ends over to the back and, again using tiny hand stitches, catch them into the line of machine stitching you used to secure the elastic.  This gives you a tiny channel which the watch pins will go through.  The following picture shows the pins in place ready to be reattached to the watch face.


Now just click the pins into place and that's it - All done!  


You could sew some to coordinate with all your outfits or be really kitch and make one to actually match your outfit.  Hey, how about making some in the same fabric as your bridesmaids' outfits so that they coordinate with the other girls and their dresses! The mind boggle at the possibilities........