Wednesday, 27 February 2013

Easter 'Crown of Thorns' Tutorial

The Theology behind Easter


Now I'm not religious, but Mr. Larkin and the children are practicing Catholics, so we all attend Mass as a family on a weekly basis.  I also have a degree in Theology and find it strange that so much is made of Christmas and yet Easter could easily pass with hardly a murmur.  Could the average person in the street even explain the meaning of the festival?


I think many people might guess the festival is something to do with bunnies and/or chocolate!


Easter bunnies are cute though!

Anyway, I am fully supportive of our children being bought up in a faith.  I know some people don't take their offspring to a place of worship because they feel 'religion should be a choice'.  However, I believe that in order to truly make that choice, they need to be exposed to faith in the first place, so that's it until they leave home!  I also desire for them to grow up tolerant and welcoming in a multi-faith society and having an understanding of their own culture and history helps them to develop a wider empathy towards all.  

So, back to the tutorial (eventually!) ... 

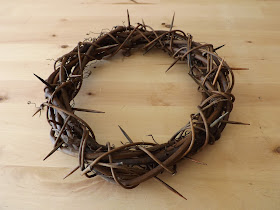
Each year after Easter Sunday Mass we have people back to the house to share in a celebratory lunch. We normally have about ten families (around 40-45 people) and the children have an Egg Hunt in the garden and we all enjoy a buffet.  This year we are going to do it a little differently with only 25-30 people but having a sit down lunch.  I am now in full flow working on this year's decorations.  The first thing I made is a crown of thorns to go atop an outdoor Easter tree, and I thought I would share a tutorial with you as it's so easy but very effective.

Crown of Thorns Tutorial


 It looks pretty realistic, don't you think?

Okay, so grab your supplies.....


25cm grapevine wreath, liquid shoe polish, pliers and wooden kebab skewers

And then, holding the wooden skewers at the blunt end so that your fingers stay clean, 'paint' the bottom couple of inches with the brown shoe polish.  I gave mine a second coat with some black as I felt they weren't dark enough.  This will all depend on the colour of your wreath, you want them to match fairly closely.


Once you are happy with the colour, you're ready to cut them down to size with the pliers


A second opinion was needed, but she agrees they're ready to be cut!


So cut them down to size and then take a break, have a cup of tea and pop the off-cuts into the wood burning stove!

Okay, next step.........just shove the 'thorns' into your wreath!


I like the effect of having used both black and brown polish as the wreath itself has a dappled appearance. The new 'thorns' blend in perfectly and look as though they have always been there.  


We are also going to use the Crown as an aide memoire during Lent and when the struggle of giving up chocolate, or in Mr. Larkin's case beer, becomes too much we can look at it and remember the supreme sacrifice that Jesus made.  Hopefully at that point our pitiful efforts will pale into insignificance and we will finish Lent joyfully!

I have also been doing a little sewing so that the Easter Bunny has some gifts to hand out from 'his' basket.  (Please, please Mr. Larkin do it, you will look lovely in the costume.....but shush don't tell anyone who it really is!)


And a close-up


Thursday, 14 February 2013

Appliqued Mirror

Free Motion Embroidered Pocket Mirror


Now Mr. Larkin and I are not aficionados of the grand romantic gesture, so Valentine's Day often passes us by.  Although last year I did sew him a personalised tissue holder, surely something every man secretly desires? Actually this expression of my love did not have him in raptures of pleasure, so this year it will just be a bottle of lager, if he's lucky! 

I've still been sewing though, and have 'borrowed' an American idea of using Valentine's as an opportunity to show appreciation to teachers!  Now I might be slightly biased, but surely this is one group of professionals which really does deserve the undying gratitude of society?

My daughter does love her teacher and so we made her a little mirror for her bag....


It is only a small gift, but hopefully one which will express our thanks for the hours of work and love she puts into the education of all the students in her care.

The colours have come out a little muted in the picture, but it is a pink and white polka dot heart appliqued onto a linen background.  I also stitched a pure wool presentation pouch to pop it into.

Happy Valentine's Day!


Sunday, 10 February 2013

Embroidered Beer Bottle Opener

As you may have seen in my post yesterday, I made a tea cosy for a much loved friend.  Well today, I made a 'beverage accessory' of a slightly different kind;

A Bottle Opener!


The children's very most favourite-ist Uncle (& his wife) have come to visit for the weekend and they wanted to give him a present, so out came the badge-making machine.  I whipped up a gift that I thought he might actually have a use for!  

I'm not sure what he really made of it, but he and Mr. Larkin are humouring me and drinking more beer than they actually want to, whilst watching the rugby, 'just to try it out'.  My sister and I are quite overcome at their generosity of spirit...........

Here is a little picture of the opener in its packaging, but please excuse the fluff which must have been on the camera lens.

Did you spot the shadow of a hair across the bottom of the label? 

Friday, 8 February 2013

Quilted Tea-Cosy Tutorial

Sew your own appliqued tea cosy


A dear friend of ours is unwell at the moment, so I really wanted to make her a gift which would demonstrate how much both she and her husband are loved.  She lives in a university town and has helped tens and tens of students to feel a little less homesick.  She also gives countless hours of her time to the local community and her church as well as supporting many charities!


As soon as a visitor walks through the door of her home the kettle is on and so the obvious thing to make her was........

A personalised tea cosy


and here's how it's done.....


Firstly collect together some heavy weight material for the main body of the cosy and some wadding/batting for the insulation layer.  I used an old cushion as my main material as this was a nice heavy furnishing fabric.  You can use a thinner dress-making material, but this would just not be as cosy!

For the wadding I used the backing from an old ironing board cover, as it's good to be green and upcycle wherever possible!  I then free-motion quilted the two layers together; in the picture I have folded the fabric back over as the quilting is very subtle on the right side and it can be seen better from the back.


Next I drew a simple tea-cosy pattern onto a sheet of A3 paper.  I then drew around this straight onto the front of my fabric.  I find this the easiest way of doing things, as I can then insure that all the applique pieces are central.  Should any of them 'walk' during the making process I can simply retrace the pattern before actually cutting out the item.  I use a 'friction' pen to do this. They are sold in most supermarkets and stationers and are really meant to be used on paper and when you rub the writing with the pen lid, the heat this friction creates causes the ink to disappear.  When used on fabric simply use an iron and, hey presto, the marks have gone!


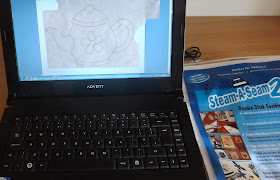
Now draw yourself a suitable design for the applique. Or, if like me art is not your strong point, find an image  on Google.  Your picture then needs to be traced onto your fusible web.  I generally use bondaweb as it is quite cheap, but today I am using a pack of steam-a-seam which I picked up in a sale.

I don't bother printing out the picture, I merely trace it straight onto the fusible web from my laptop;

  
Don't forget that when using fusible web the image needs to be flipped.  Now I'm not sure how to flip text on the computer so that it is a mirror image. So I simply used tracing paper on the laptop screen to copy the writing and then turned the tracing paper over and put that underneath the bondaweb/steam-a-seam.

Look carefully at the following picture and you will see the reversed text waiting to be applied to its fabric.


Lay out all of your pieces and once you are happy with the design,  iron to fix it.  You are now ready to stitch the applique into place.  I used an open-toe applique foot and a reduced stitch length;


If your machine allows you to stop with the needle down this will make turning corners much easier.  Simply stop, leave the needle in, raise the foot, pivot the fabric, drop the foot and resume stitching.  


If you prefer, you can also use a darning foot, drop the feed dog and free-motion quilt around the pieces.  Once all the stitching has been completed check that the design is central, and if happy cut out;


Then pin or tack a tab at the top of the cosy;


Okay, almost there!

Place the front and back of the cosy right sides together and stitch.  Turn right side out and press.  Now chose a lining fabric.  This can be a lighter weight than the cosy iteslf.  I chose a lovely cupcake design.


Use your paper pattern to cut two lining pieces.  Swing your sewing machine needle over to the left so that the lining will be ever so slightly smaller than the cover.  Do not forget to leave a gap in the seam so that you can turn the cosy right side out at the end!

Now pin the cosy and lining right side together and stitch along the bottom.  Turn it through the gap in your lining so that it is now right sides out.  Hand stitch the opening closed.  I then top-stitched the cosy a couple of  centimetres up from the bottom so that the lining was nice and secure and that's it.........

All finished


Thursday, 7 February 2013

Beano Decoupage Tutorial - It's just posh collage Dennis!

How to create a 'Graphic Novel' work of art from old comics!

(Scroll down for tutorial)


The children had not been putting enough effort into their music practice this last week so 'screen time' was completely banned. This left the question as to what to do instead.  Sitting in the garage was an old table which I had bought years ago from a local school when they were selling off uncollected technology projects.  Now I am happy to help schools raise money for additional funds, but that table was ugly (although the least bad item of the bunch, there is obviously a reason students do not claim some pieces of work!) so we set about altering it.  Firstly we toned down the pine legs by dry brushing them with emulsion (vinyl) paint. It is a really subtle effect and very easy to do, it gives a lovely soft limed feel, rather like weathered drift wood.  The table now had a tasteful neutral look which would really allow the pictures on the top to 'pop'.  


Then Mr Larkin and the children settled down to cut out suitable images from a stack of 'Beanos', which I had bought for pennies at a car boot sale last year.  I simply stuck them on before finally giving the whole thing a couple of coats of varnish.

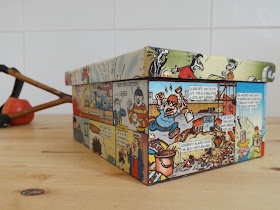
We also covered a box which my daughter had made during a 'B&Q' children's DIY lesson.


Doesn't it look good?


The inside was just as fine...


Mr Larkin then suggested that I blog a tutorial on the subject, which seemed a great idea.....but we hadn't taken any photos along the way....so....

We began yet another project; this time an 'Aroma Fan', which my son needed to decorate before his next technology lesson.  He is only in Year Eight, but his school has a brilliant Technology Department and he has made some fantastic items.  It is always a pleasure to support him in his homework tasks and it gave me the opportunity to write the following tutorial. 

Graphic Novel Decoupage Tutorial


(When I was in our local library a few years back I was very much amused to discover that comic books are now 'graphic novels!)

So, decide what you want to cover, then grab your pile of comics, Asterix graphic novel or whatever else takes your fancy, the technique works equally well with those pretty 'posh' paper serviettes.


Our blank item - an 'Aroma Fan'

You will also need glue, varnish, black permanent marker pen, ruler, craft knife or sharp scissors and a paint brush.


My son then coloured his aroma fan (from now on referred to simply as a 'box') black. He felt this was necessary should any gaps show between the pictures.  I actually don't think that it this is needed as any gaps can easy be touched up with a black marker pen at the end.  He coloured his box in with a marker pen as he didn't want to wait for a coat of black emulsion paint to dry.  However, this was both slow and smelly, so I would recommend the emulsion paint should you want a black base on which to work.


Then simply choose your images and stick them on.  We used 'Pritt Stick' until it ran out at which point PVA white glue was substituted  I found the only trick to gluing was to use the barest amount possible.  If you use too much it can lead to wrinkles at the varnishing stage.  To get the PVA glue thin enough we used a credit card as we couldn't find our glue spreader!


I like my pictures to fit perfectly, but I know some people prefer just to stick them on in a random fashion.  Should you prefer the more 'ordered' look you will probably need to trim some images to fit.  This is really easy - Simply draw a new black border around a section of an existing picture and cut!


Pen and cut.......easy!


Keep selecting and adding pictures until you are happy with your design and then leave to dry thoroughly. The final stage is to add a couple of coats of varnish to protect and seal your precious new work of art!  We used a tin of water-based varnish polyurethane for the table and decoupage (serviette) varnish and glue for the aroma fan.  They both worked equally well.  Just be sure to use a couple of thin layers as wrinkles will appear if the pictures get too wet.

Leave to dry and then admire your efforts!